Sunday 5 December 2010

Post 13: Advanced Production Skills Workshop 3

In class we where having group’s discussions about ways to enhance the quality of our video work through the technical element of lighting, in addition to trying to develop a sense of style on our own production work. We began by looking at how lighting effects sources and colours.

A quote by broadwell and Thompson states “Lighting can be characterised by its source. In making a documentary, the filmmaker may be obliged to shoot with the light available in the actual surroundings. Most fictional films, however, use extra light sources to obtain greater control of the images look. In most fictional films, the table lamp and street light you see in the mise-en-scene are not the principle source of illumination for the filming.” From this quote its clear that filmmaker may be limited in what sources of light they can use and what is available to them, for example, if they are filming in an already built location that is used in everyday not just in their film, then they have no option than to just use the light sources they have available such as windows and ceiling lights. In addition this also applied to our productions, as we don’t have the money to be buying and using light worth hundreds of pounds we are forced to use the light available however can use additional lighting to add different effects and colours.
This picture from Harry Potter shows the addition lighting they have added into this scene. From the mise-en-scene and from the audience point of view the light source is meant to be coming from the old style street lamps however this would not illuminate the characters enough and would cause a lot of shadow. This had lead them to add and overhead light to illuminate the two characters faces and clothing.  

 As a class we then look at two images from Forest Gump. The first of the photos had a lot of real natural lighting as well as using soft lights to create this look. We noticed that they’re a small amount off attached shadows on their clothes, which was created by the soft lighting, which reduces the difference between the light and dark areas. In the second image it was the complete opposite that used hard lighting, which made it, look very artificial. It was also a hard quality which created a bleached effected on the clothes meaning we where unable to see and attached shadows.  

When then looked at another two images at how lighting can be used to create different atmospheres. The first image was of a bear corridor; the filmmaker would have no control over the light sources as they are already in place. The lights are at the highest point possible illuminating the whole corridor. The hard bright light creates reflections of the walls and floor. The second image we looked at was taken from a film and had a much more interesting atmosphere from the audience point of view. The light sources they have used create shadows below the lights themselves pointing the light upwards. There is also ceiling lights hidden by the piece of wood pointing down so we can see the middle of the corridor, there is also an additional light source coming from in front of the character to illuminate the mans face.

In class we then went onto looking at the different areas of the mise-en-scene and how its just as important to think about the light sources there as well as the location.

When we look at any lighting in film we normally associate it this with two different lights, such as the key light and the fill light. The key light is used to provide the dominant illumination and normally casts the strongest shadows. The fill light is used to provide the less intense illumination, which ‘fills in’ and softens the shadows. This is linked to research that I carried out last year for our opening sequences where I looked at 3 point lighting. In classical Hollywood film making developed the custom of using three-point lighting. However, this needs to be used with care as lights may need to be moved depending on the position of the camera but continuity of lighting must be maintained.
As a class we where then spilt into group and asked to look further into effect of lighting and how it can be used to create an atmosphere, relating back to the photos we was looking at earlier in the lesson. We were all given a different school corridor and we were asked to shot two different scenes. The first was using the light that was available to use such as ceiling lights or natural lights and then for our second scene we had to find a way of manipulating the light to change the atmosphere of the shot. Our video is shown below.


Our first shot we was using the light sources that were available to use, this was the natural lighting coming from the windows and the ceiling lights. For our next shot however, we used off the ceiling lights and turned on the spotlights in the ceiling we moved the lights so they were facing down on my face. This had a massive effect on the atmosphere it no longer felt and looked like a school corridor and could be any location. This was very successful and we were very pleased over all. However, we was unable to block out all off the natural light coming which lead to a mixture of artificial light and natural light which doesn’t come across very nicely on film. If we were to do this task again I think we would try harder to block out the natural light so we was only left with the artificial light.

After looking at the different way in which lighting can change the atmosphere, we then looked at colour temperature and what different sources of light caused different colour temperatures. For example North light is the brightest light source and is 10,000 Kelvin, where as candle light is the lowest at 1000 Kelvin. Trying to create the right look when shooting a scene can be time consuming in addition to trying to balance out the different colour temperatures. However there are ways in which you can achieve the look you want, for example, trying to match up all the light sources to one specific colour temperature either tungsten such as candle light or daylight such a North light.

One example would be your shooting a scene that has daylight entering through a large window with tungsten light sources inside. As a director you need to experiment different ways in which you can achieve a nice look so that the daylight outside wont look washed out or look to white. One way of over coming this would be to add red gels over the windows to turn the day light into tungsten light, however, this is very time consuming and requires a highly skilled team. A much cheaper and quicker way would be to add blue gels over the light sources inside to match the daylight from outside.
An example of this was done by another group in our class who added blue gels to their light source to the make the artificial light look like natural day light.


After looking at the different kind of gel to make the colour temperatures add up, we then looked at how to add warmth into a image. There are two different ways you can do this, the first, is to have a video colourist fix in the post production stages. However, this is expensive and very time consuming. The second way would be to add a red 85 onto the camera this will make all the light sources match the daylight. Another way you can do this is to add a white balance to a light blue card this tricks the camera into thinking the light blue is white. All these techniques will produce warmer tones on the image.

This is an example of the use of an 85 red lens being added to the camera, we can see that the second image Is much warmer and is over all much nicer to look at. When we are shooting our own shot films we need to remember all these different techniques. We need to plan and think carefully about what kind of atmosphere we want to create and how different light sources and colours will have and effect on the over all image.


Thursday 2 December 2010

Post 12: Advanced Production Skills Workshop 2- not finished

During a class lesson we were asked to think about the quality of video production through technical elements such as lighting, we did this by looking at two main elements, which were direction and quality. When we look at quality we are focusing on the intensity of the illumination for example, hard lighting, which is a direct light source creating bold shadows with crisp textures and edges. On the other hand soft lighting such is indirect light of diffused which blurs contours and textures, and there is a softer contrast between light and shade. When we are looking at the direction of light we are concentrating in which the light source has been positioned for example back, front, side, above and how it bounces of different surfaces. Every light source has a point where it is brightest, and a point at which it wanders and loses itself completely.
This is an example taken from the Madonna Vogue music video. We can see from this picture that they have used a soft light source, which I turn as created an image, which has blurred contours and textures. This is shown on the faces, which don’t have defined shapes and curves. Its also shown in the women’s clothing as it is unclear what she is wearing due to the softer light source not illuminating the clothing.

This example is again taken from the same video however; this is an example of hard lighting. We can see this through the direct intensity of the light illuminating the diamonds on her back. The direct light source has created crisp textures and edges again shown on the diamonds as well in the outline of her shoulders. We can also a bold dark shadow underneath her arm.

In class we were separated into two different groups, one looking at direction and the other looking at quality. In my group we were given direction to focus on. We were given the hypothesis “how can you manipulate your lighting set up to achieve variations on direction within your lighting designs?” As a group we had to allocate roles these where Director, Camera, Clapper, Recorder and Gaffer. I chose to take on the role of Recorder and was responsible for taking down notes on the experiments variables and monitor decisions and revisions made. Where were given a range of equipment to use in our experiment and were left to come up with our own decisions on how we would like to set up and arrange our experiment. Are equipment was;
  • Mini DV camera
  • Tripod
  • Batteries
  • Base plate
  • Tape
  •  Laminated whiteboards and marker pens
  • 1x lowel pro 250W lamp
  • 1x stand
  • Extension lead
  • Barn doors
  • Torch
  • Black wrap and crock clips
  • White materials and tin foil
  • Safety gloves
We were then asked to look at pictures from the Vogue music video and identify the concept of direction of light within them. As a group we came up with the following points
  • The direction of light helps to show the main characters
  • It helps creates shadows and effects within the pictures
  • Shows body features such a clothing differently depending on the direction
  • Helps to highlight facial expressions 
  •  Help to add tension into a scene.
After looking at already existing photos of direction of light we then had to make predictions on what the equipment will do to then quality of light. As a group we predicted the following:

  • The black wrap will focus the light and make it darker whereas the foil will make the direction of light brighter
  • The use of the umbrella will make the light softer
  • The white sheet will be used as a back drop to block out any unwanted shadows as create a clear background
  • Whiteboards will notify the audience if what they are about to watch
  • The tripod will mean we can steady the filming when moving the camera.
Then we had to identify the factors that will need to be changed. As a group we said the intensity of the light would need to be changed. The equipment and materials will need to be changed to show the different directions. The position of the light will need to be changed. We then had to identity how will we measure and record the effects while remaining safe; we said that we will record the direction of light through filming. We will make sure we move and hazards out the way before filming. We will make sure that we read through the risk assessment before we start filming, this lead up to make sure the Gaffer will constantly need to be wearing safety gloves when operating the lights. Finally we had to say what we would be keeping the same, we would keep the same person we are filming throughout our experiment so it will be easier to see the different effects. We will also keep the position of the camera the same throughout.


From looking at the video we can see how by the use of different equipment and reflective surfaces change the direction of light, some example I have noticed is

  • 0.06- here we are using a front light and the use of barn doors and we can see the brightest point of intensity from the light to the side of him while in the top right hand corner the light is fading away into the black background.

  • 0.51- here we can see the use of hard lighting which is shown by the sharp, dark showed created behind him.
  • 1.04- through the use of manipulating the barn doors we can see we have created a tunnel effect where the light is just focusing on his body and nothing else around him.

  • 2.13- when we have used the barn doors and place the light as a backlight we can see that we can direct the light completely off his body, which creates the looks of a silhouette effect of his body shape.
  • 2.30- we can see that again through using the barn doors we can direct the light to just one side of his body.
  • 2.50- through the use of a side light we have create a softer lighting and has crated a lighter and bigger shadow of the body.
  • 4.16- when we have used the silver foil we can see that the direction of light is much softer and let intense. This is showed as the shadow fades away and isn’t so sharp. Manipulating the foil created this.
  • 4.54- we used the black wrap here to try and bounce the light back up to the body. We can see that light is less intense and it is harder to see his body shape and facial features.
  • 5.45- here we have used a white sheet placed underneath him to try and reflect the light and make his face bright. This was successful as his face is much more illumined.
  • 6.06- we then tried to create a contrast and took away the white sheet. This wasn’t very successful as the table was grey and was still very reflective. However we can see a small shadow on the left side of his face, which wasn’t there before hand.


I think we had many strength to our experiment and was very successful in showing how the different position of light can have an effect on the direction on light. I think the use of the barn door was most successful as we could really see the difference in direction and how it created different effects such as the tunnel and how the shadows faded away. If we were to do this task again I think that we should move out back light further away making sure that it wasn’t in the view of the camera. A lens flare can be seen in our video as we placed the light source to close to the person.

Quality
The other group where given the task to look at quality of lighting. By using the same pictures that I have looked at in direction I can now look at them again but this time focusing on quality. I can see that there is a variation in the different qualities of light. In the photo of her close up and her back I can clearly see that they have used hard light to clear the crisp textures and edges. I can also see that in some of the pictures they have used hard light that have created bold shadows such as the man walking down the stairs. Finally I can see that they have used soft lighting such as the two people sitting down, we can see the blurs of the contours and textures and it easy to see the difference between the light and dark areas.

The equipment they had was:
  • Mini DV camera
  • Tripod
  • Batteries
  • Base plate
  • Tape
  • Laminated whiteboards and marker pens
  • 1x lowel pro 250W lamp
  • 1x stand
  • Chimera and diffusion attachments
  • Speed ring
  • Black card
  • Black sugar paper
  • Scissors
  • Safely glover
  • Extension lead
The predictions I can think will happen are;
  • You will be able to show the difference between the hard and the soft lighting through the use of equipment.
  • To be able to see the different quality effects in different shots
  • The use of diffuses would have an effect on the quality of light.
The factors that will needed to be changed our
  • The direction of the camera for example the distance of the light to show the different light effects and how this will create different shadows.
  • The different diffuser that you will add to the camera will need to be changed to show the effect it has on quality.
The factors that will stay the same
  • The position of the camera will stay the same throughout the experiment
  • The lighting position will need to stay the same. This will allow the audience to see the different types of lighting such as hard and soft.


Even through there film was very shot and it was hard to see the changed between each scene, when you pause the image and then compare it is much easier to see the difference for example
  • 0.01- this is an image with no diffuser and it just hard lighting we can see that the right side of his face it illuminated at the left side is in shadow. The direct light it’s hitting is face and clothes and reflecting of him.

  • 0.10- this image is again hard lighting however with the use of a flag, where they have used cardboard and placed it on the side of the camera to block out an unwanted light. This has also channelled the light to just the left hand side of his face, while the right side is in shadow and is much darker.

  • 0.23- here we can see the use of an ½ diffuser and no flag. Compared to the first image we can see that the image is much softer and it much nicer to look at through the camera and for the audience.
  • 0.44- here we can see where they have cut cardboard to try and create a blind effect on their character, even through it wasn’t very successful you can still see the cast shadows on the character.
After watching the film it was very difficult to see the different effects using the filters and the cardboard, this was down to the shot being very shot meaning we didn’t have much time to see the changed clearly. However from watching their video and listening to there feed back they had some strengths and weakness within their experiment as well as things they would do differently if they had the chance. These where:

  • As the camera was out of focus it was clear that the camera was focusing on the laminated board rather than focusing on the character, meaning the shot was blurry. This was due to the camera not having enough time to focus on the character after the laminated board was out of the scene due to the fact the shot were very short.
  • When it came to planning and using the camera they said they would have liked to have more of a group discussion on planning what they wanted to do as they left it was rushed.
  • This lead to the length of the film being very short, they said they would have liked to film for longer if they had the chance, as the shot were too short to distinguish the difference between the qualities of light.
  • When they tried to create a blind effect of shadows on the character it wasn’t as successful as they had planned. This was due to the fact they had used cardboard that wasn’t very strong. They said if they were to do this again it would have worked a lot better and had a much effect if they could have used a much stronger material to cut the slits out off.
After looking at both quality and direction, I think it has given me a lot more of an understanding of the different effects lighting can have on your on screen image. I have a better understanding about the lighting in production in films it importance in production. When it comes to creating our own short films we need to consider the different light sources and what effects they will have in conveying different moods and representation of the characters. This workshop has made me realise that when we do our own filming a lot of through and consideration needs to go into planning what lighting we want to use and what effect we are trying to create, its also important to remember the different types of equipment we can use to help manipulate the light such as barn doors and light diffusers.

Sunday 21 November 2010

Post 11- Advanced Production Skills Workshop 1

When I think of lighting the first thing that comes to mind is, lighting is used to illuminate characters on screen. However In class lesson we spent time looking in detail at lighting and how it can be used throughout a film to create different styles, effects and illusions. Our teacher introduced us the Film Noir translated to ‘Black Film’, this was a 1946 film produced by Nino Frank who was a French Film Critic. The film was described as reflecting trends of American Crime and Detective films through the period of depression after World War Two. An example of this is Double Indemnity produced in 1944. The term Film Noir soon became know as a style that can be used to create mood, tone and to show point of view, all of which is done and created through lighting. There where many characteristics that was associated with Film Noir, which was Dark, Downbeat and ‘black’, looks and themes were evident.  There are many different definitions and opinion of Film Noir however, the links below are supporting the definitions I have mentions above.  

As Film Noir become increasingly popular within film making it was important to develop an understanding of the conventions that where associated with this style. The first is themes; all films would be displaying the insecurities of the time period, as well as counter balances the optimism of Hollywood’s musicals and comedies. The second was story, generally they were cynical, hard hitting, disillusion male character who encounters a beautiful promiscuous, amoral, double dealing and seductive “female fatale.” The women would then manipulate him into being the ‘fall-guy’, which often follows a murder.  Below is a video of clips taken from Double Indemnity an example of Film Noir and how it is clearly showing the typical story line of a film of this style.

After watching the shot clip of an example of Film Noir we then looked more closely at the type of lighting that has been used and the different positions of the lights. Lighting is used as a way of highlighting and creating shadows that can be used to manipulate the space of a scene. There are two different types of shadows as these as,
  • Attached shadows. These occur when lighting fails to illuminate parts of the object due to its shape and size
  • Cast shadows. This is when objects block the light source and ‘cast’ a shadow.
Through the cleaver use of lighting you can show the protagonist who will have the bright source of light on them, which draws the attention of the eye for the audience. This leaves the less important characters by which darker light and will often fade into the back ground.

From this picture here we can see an example of a cast shadow. The Blinds are blocking the light source from the outside sunlight and is creating a cast shaddow onto the standing up man. The shadow is easily seen on the mans tie and trousers to the audience where there is  the pattern of the blind.


This is an example for an Attached Shadow. Looking at the left hand person, the right side of his cheack has failed to be illumined by the light due to  his hate size and shape, this in turn has created an attached shadow.

After looking at the different types of shadows we then moved onto looking at how light can have an effect on shape and texture of different objects. We were shown a short video of a lemon being filmed and how the use of manipulating the light source has a dramatic effect on what you are filming.


After watching the film it was really interesting to see how just manipulating the light source can change the texture and shape of the lemon. It was also interesting to see how long you could watch the video before you actually new what the object was. In class we were then asked to create our own lemon video using our own object. As a group we chose to use a dried sweet corn as it had a large range of different textures and colours. By changing the settings on the camera we managed to focus the camera on the sweet corn and it was much easier to see how the movement of light position changed the shape and texture from the audience point of view.  


Wednesday 10 November 2010

Post 9-Individual Script Feedback

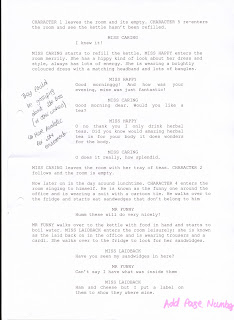
Below is the first draft of my script with additional notes. I added these notes when looking over my feedback and trying to find faults and ways to improve my script. The feedback that was given was from Becky Knapp, class peers and our teaching. We was given a lesson from Becky Knapp a few lessons before on the best way to produce and script and how to make it of good quality, now we had created our script she came back to school to read through them and tell us ways we could.

Feedback
After giving my script to the class it was interesting to see the feedback to it. It was said by many people that I needed to come up with names for my characters, as the way I had named them such as ‘character one, Character 2’ was very confused when it came to reading. Another problem that I found was the ideas that I had in my head didn’t come across in the same way. Personally I could mentally imagine what each character would look like and the environment it would be set in. however this wasn’t coming across in my script as it lacked detail and description of each character, this meant that when it came to redrafts I would have to work on explaining each character in the simplest terms. From other feedback I noticed that the language and sayings I had used didn’t reflect the personality of the character in the greatest way. Feedback from Becky Knapp and our teacher showed me that I had the correct layout for my script with a correct font however I had missed out some vital points such as scene number, page numbers and a front page, these where silly mistakes that I had made.

The feedback that I had received from Becky Knapp was that there wasn’t enough story to my script, to overcome this problem I decided that the best way would be to take out a few characters and develop other characters more in dept so the audience will be able to relate to the characters better. She also mentions that I could add in some gossiping between a few characters, as this is realistic in an office environment. She also decided that I created a punch line to the end of my script that would make a point to my short film. However lots of people said they liked the idea of my script but just found it a bit confusing.

Ideas for second draft
After thinking about the feedback I had received I decided to create a few questions that I should answer to help develop my script. These questions where

  • Where is the office?
  • Who is watching them?
  •  Why are they being watched
  • Are the stakes high enough?
To answer these questions I did some addition research into job that I think would be associated with the importance of being watched 24/7. The ideas that I came up with could be a police office, a secrete spy office or a normal every day office that is being watched by a spy office secretly. For the question who is watched them, I come up with maybe the Boss of the company is watching them to see how much time they are wasting not working and will find a way of punishing them in some way, or as I mentions above another company or office that is watching them however they aren’t aware they are being watched. For why are they watching them, I thought that maybe to see how much time they are wasting which I mentions above or a secrete company are looking for new people to recruit so they are watching them instantly. And finally it could be the boss watching them listening out of gossip and to see if anyone knows about the affair. Finally for are the stakes high enough the audience will know they will be fired.

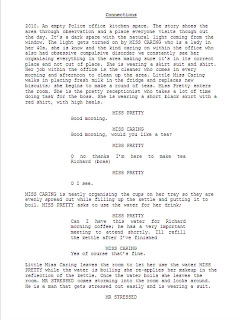
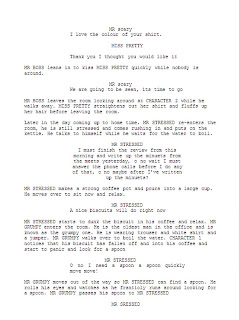
2nd draft of script


How I did change my script

I decided in the end to have the location and environment set in a police office, I finally decided on this idea, as you would get a wide range of people going in and out through out the day from the officers to cleaners to receptionists. This now meant I could add the location in to my script. This answers one of the questions I had though about before, to answer the other questions I decided that it would be the Boss listening in to the gossip that goes around the office and makes a record of it to use in his advantage as a way of blackmail when he is in need for something. When I was looking through my feedback I thought of another problem that hadn’t been mentioned, this was the location of the camera. The shot sizes and position of the camera would be the same throughout the film, which from an audience’s point of view would become very boring. This lead me to thinking about different ways in which I would change the positioning of the camera, first I came up with the idea that the kettle could move around the kitchen throughout the day. However I didn’t like this idea very much as I felt it would still be very limiting, this lead me to my final idea. I would film all of the short film in many different angles like you would see in any normal film but, the very last shot would come from the point of view of the kettle where a secret camera had been hidden by the boss. This would then lead onto another scene where the audience would see the boss watching at his computer all of the footage.

With the new changes to the script and the environment now chosen, I decided that some of the character could be changed. For example I wanted to change the Little Miss helpful to the cleaner lady who comes in every day to help organise and tidy up the space. After looking through the characters I felt that the others could the same however just add in the types of jobs they had for example Mr Messy could be the ‘newbe’ of the office.


Post 8- Decisions and Revisions

After looking in class at the many different areas where as can receive ideas on script writing, we where then asked to start coming up with our own ideas for our short film. Looking over our class notes on identifying sources, which can serve as the basis for a dramatic/ documentary project, lead me to start having two main ideas for my script. My first idea I had taken from a news story I had seen and had caught my eye. The Dominate Hegemonic message would be following a young boy that was being bullied at school from others in his year, through cyber bullying as well as face-to-face.  http://www.bbc.co.uk/worldservice/news/2010/10/101005_cyber_bullying_nh_sl.shtml This story of cyber bullying it is much more server and powerful than the story line I wanted to create, so this lead me to adapting the idea of cyber bullying but in a school environment with younger students. My second idea was to use a place as the main storyline for my script rather than following a character in human form. The Dominate Hegemonic message of this short film would have been following the different relationships between people.

After looking at both ideas we then had to think about answering questions on the characters World, Character, Problem, Want, Need and an obligation. I had decided to go with my second idea and focus on looking at a place, from here I thought that a train carriage would be a really interesting place to follow during one day as it has such a diverse range of people throughout the day. Once I had answered all this questions about my script we then told our ideas to the class to hear they feedback on what we had created. The picture below show the 8 Point Guide that i had written for my short film when it was based around a train. However the feedback I received was that it would be a very hard location to film and some people might not like the idea of being filmed without knowing. My idea was also very different to the others and was more documentary based rather than fiction. After listening to the feedback it lead me to rethink my idea and make some changes, I still wanted to be based around a place and look at the relationships between different people. After talking it over with peers and our teacher I decided to move away from the documentary side and more towards the fiction stories, my short film would now be filmed coming from the perspective of a kettle in an office environment and follow different characters throughout the day by observation.

In class we was next asked to answer 8 questions about our short film ideas and come up with three different questions under each topic. The 8 different topics where Characters, Noises, Nature, Numbers, ……….. add in video link 

Now that I had answered all the questions and had a good idea and understanding of what I would like my short film to be about, I now needed to think of the different range of characters you would expect to see in an office as well at the different personality types. I decided to base my ideas of characters from the stories of the Mr Men books, knowing younger children and it being a TV programme was of great use when it came to research. Through my independent research I also found a website that showed me all of the characters they had created which was very helpful.http://www.mrmen.com/uk/. After looking into the different characters I concluded that I would use Little Miss Helpful, Little Miss Naughty, Little Miss Chatterbox Mr Scatterbrain, Mr happy, Mr Lazy, Mr Grump and Little Miss Scary. I would use these characters as a bases to create different personality types

Once I had created the different personality types and characters I now needed to think about what role they would play in my short film, thinking out what kind of actions you would expect to see from them around the kitchen/ kettle area. This lead me to creating a time line of what I would like to see throughout the 6 minuets as well as when the different characters would enter and exit the scene.


Character Porfiles
Before I could start writing my script I needed to use my independent research and create character profiles. I decided to have 8 different characters, which is shown in time line above. I now had to think about how the different Mr men that i had chosen to use would be reflected in human form and their actions on camera that would reinforce their personality.

After creating the timeline and character profiles I then we onto writing my script, I used all my independent research as well as scripts given to us in class by Becky Knapp to help me produce my script. This was long and time-consuming task as it took at lot of thought and planning. It was very helpful to use the example scripts to use as a template. I found the most time consuming element was trying to think of actions and speech the characters would be doing and saying to reflect their personalities. Another problem I had relating to this was trying to make it last for 6 minuets, However I found that my time line I had created became a great help as I had a plan to follow and try to pad out.

Plot Outline
All the camera work will be coming from the angle of the kettle to make it look like that is the point of view to the audience. The first scene in my short film will start the light being turn on and the entrance of Little Miss Caring; she brings in fresh milk and new biscuit for all the workers. We see she organising the kitchen and begin to make a round of teas. We then see the arrival of Little Miss Naughty who is always looks so trendy and young, she has come into make coffee for the boss as take job for the boss very seriously and see only herself wise enough to take on these jobs. While waiting for the kettle to boil Little Miss caring leaves while Little Miss Naughty reapplies her make up in the reflection of the kettle and then leaves. As soon as she leaves we see the appearance of Little Miss Scatterbrain, she is mumbling to herself and is rushing around forgetting why she even came in. we next see the reappearance of Little Miss Helpful who starts again in making her round of teas and is soon joined by Mrs Happy. Mrs Happy is the hippy of the office and her life revolves around her health such as eating organic foods and herbal teas, this is a big passion of hers and likes to share her views with others.

Later in the day around lunch time we see the entrance of Mr Messy he is the funny comedian in the office and has a lack of disregard for other peoples belongings which is shown when we see him eating someone else sand wedges from the fridge, and move onto boiling the kettle. Next we have the entranced of Mr Lazy, he is known as the laidback one of the group and doesn’t take his job to seriously. He comes in to look for his sand wedges but quickly realises that Mr happy has eaten them. This leads Mr Lazy to taking someone else lunch for himself. We then start to see Mr Happy true colours when he start to make a Hot chocolate entertaining others around him with his over enthusiastic approach to making a drink and as many different toppings he can add. The happy upbeat mood is soon dropped with the entrance of Little Miss Scary who is actually the male boss. This leads to the exit of Mr Lazy and Mr Happy, leaving Mr Scary alone in the kitchen. After a few moments of him being alone we see the re-entrances of Little Miss Naughty and soon realise they are having a secrete affaire behind the other workers backs. They share a quick kiss and complements and then quickly hurry back to work.

Now towards the end of the day we see Little Miss Scatterbrain enter the kitchen area still stressed and rushing around but comes in a makes a strong coffee. She sits down and relaxes with a drink and biscuits. The final character to enter is Mr Grumpy he has worked at the office for many years now and doesn’t enjoy his job at all. He enters the room moaning and soon turns his moaning to Little Miss Scatterbrain. Little Miss Scatterbrain. Quickly realised and starts to panic that she dropped her biscuit into her drink and quickly needs to find a spoon. All the commotion and flapping around drives Mr Grumpy out of the room and leaves. Once Little Miss Scatterbrain has clamed herself down she to them leaves the room. The final scene will be the re-appearance of Little Miss Helpful who comes in to tidy up the area and turns of the light.